
Getting the perfect photo for your passport or visa can be a hassle and a challenge at the same time. Long queues at photo studios, strict government requirements, and the risk of having your picture rejected for the smallest detail can turn what should be a simple task into a stressful ordeal. Maybe the background colour is slightly off, your head size doesn’t meet the exact measurement, or you’ve just wasted time and money on photos that won’t even be accepted. These days, when travel has become such an essential part of both work and leisure, having a valid passport or visa ready is more important than ever. And that means your photo has to be absolutely spot on—no compromises. In this post, as part of our travel tips series, we’ll review a new online service we recently encountered that can make the whole process much easier
It’s called PhotoGov, and it’s a lifesaver as it makes creating the perfect passport photo effortless! With PhotoGov, getting your passport photo ready for submission – whether as a mobile or computer app – is a breeze.
This guide will help you through the process of taking and adjusting your photo according to the requirements set by the U.S. State Department. Let’s get started and ensure your passport photo is perfect!
Step 1: Know The Passport Photo Requirements
Before you take your photo, it is essential to know the official passport photo requirements. These specifications have to be followed if you want your photo to be accepted bythe authorities for your visa or passport. Here’s an overview of the most important passport photo specifications:
| Requirement | Specifications |
| Size | 2 x 2 inches (51mm x 51mm) |
| Resolution | 600 x 600 pixels |
| Background | Plain white or off-white |
| Head Size & Position | Head should cover 50%–70% of the image height |
| Expression | Neutral expression with mouth closed |
| Lighting | Even lighting, no shadows on face or background |
Essential Considerations to Make Sure Your Photo Satisfies These Requirements:
- Head Size & Position: Your head must be centered in the photo and should occupy between 50% and 70% of its height. The top of your head must be between 1 to 1 3/8 inches from the top of the photo.
- Expression: Your eyes must be open, and your mouth must be closed. Look straight ahead. Smile and do not frown.
- Background: The background must be plain white or off-white. No other colors, distractions, or objects should be visible.
- Lighting: The lighting must be even so that there are no shadows on your face or in the background.
Meeting these requirements ensures compliance with the Department of State and makes the photo usable without complications.
For more information and updates on passport photo requirements, check Travel.gov.
Step 2: Submit Your Photo on PhotoGov
With the requirements in mind, proceed to upload the photo to PhotoGov. Whether you are on a desktop computer or a mobile device, the upload process is quick and simple.
How PhotoGov Works:
- Click on the link to access PhotoGov on your PC or laptop. For those on the move, you can get the app on iOS and enjoy seamless access on the go.
- Select and Upload Your Photo: Press the upload button, and the app will adjust your image to the correct proportions. However, you will get the best results when you upload a clear, high-resolution picture.
- Automatic Adjustments: The app will also automatically adjust the image’s background and vital elements to the official standards, including cropping the image to the required 2 x 2 inches (51mm x 51mm) and resizing the head.
- Instant Feedback: The app will check for any compliance issues. If any are found, the app will give clear and simple-to-follow guidelines, ensuring that all critical details are adjusted properly.
- Preview the Adjustments: If everything looks good, you can move to the app’s next step to download the image.
Their iOS app works even better than the website, offering automatic adjustments with just a few clicks or taps.
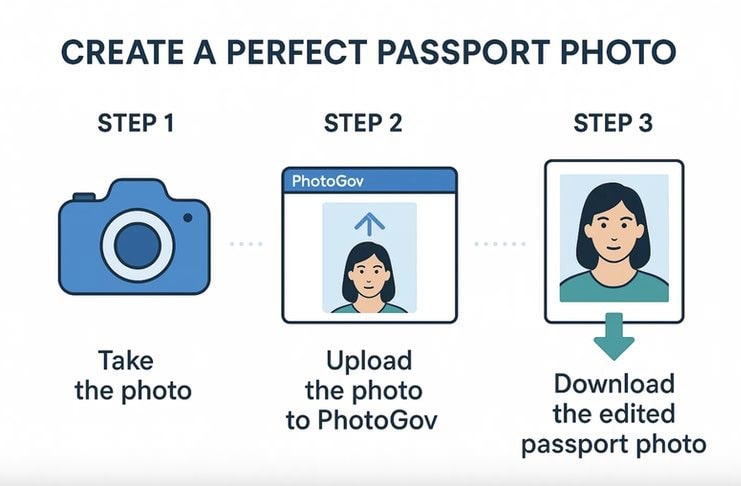
Step 3: Downloading Your Photo and Print
When your photo is ready and adjusted, just go ahead and download it. The app will give you a 600 x 600-pixel photo that is high quality and meets all the necessary requirements. You can print it yourself or get it professionally printed.
What You Should Do After Downloading:
- Save the Image: Access your device and use the “Download” button. Make sure to check the “device storage” so that you can save it in a location that is easy to find.
- Print Your Photo: If you’re printing it yourself, ensure that the print resolution is set to 300 dpi (dots per inch) for the best quality. Alternatively, you can take the photo to a print shop for professional printing.
- Double-Check Your Photo: Review your photo afterward to make sure that the head size, background color, and expression meet the guidelines. With your passport application, it’s important that your photo meets the requirements. If you have any doubts, you can always re-upload the photo to make sure it meets the specifications.
Tip: Remember to check if your passport application requires you to upload a photo or if it needs to be printed. Some services accept both, so make sure to check which one.
Watch this video to get a better understanding:
Why Use PhotoGov?
You may be thinking, “Why use PhotoGov?” Well, I’m glad you asked. Unlike other services, this app eliminates all the problems related to the creation of a passport photo, streamlining every step to save you the most time possible.
With PhotoGov, you won’t have to deal with issues related to dimensions, resolution, lighting, or background. The tool solves every challenge on its own, ensuring your photo is fully compliant with the standards and requirements.
Unlike other apps, this application also makes it easy for mobile users to generate their passport photos on the go. Additionally, whether you are printing your photos from home or using professional services, ensure they are always the correct size and resolution.
Final Words
With PhotoGov, you no longer have to struggle with getting your passport photo and meeting the official requirements – it’s all very straightforward. It doesn’t matter whether you’re using the online tool on your computer or the iOS application – you will have your ideal passport photo in no time.
Leave a Reply